What is a State Machine
A StateMachine allows you to manage different states for any game element.
Examples include:
-
A chest: initially closed and interactable. When the player interacts with it, it opens. The chest has two states: closed and opened.
-
An enemy: patrols an area initially. When the player enters its detection area, it begins to follow the player. The enemy has two states: patrolling and following.
-
The player: initially alive and controlled via inputs. When health reaches 0, the player dies and can no longer move. The player has two states: alive and dead.
Each state defines a specific behavior for an entity. States are implemented as scripts that inherit from the State class, enabling them to be managed by a State Machine.
The StateMachine node
The StateMachine node is responsible for grouping multiple states (as child nodes) and managing their lifecycle.
While a single StateMachine node is typically sufficient, you can add as many State Machines as needed under any node. Each StateMachine independently handles the activation, deactivation and processing of a single state under it.
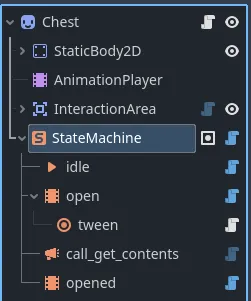
Adding States
Once you have added a StateMachine to a node, you need to add one or more states under it to start managing the node’s behavior.
To add a state:
- Add the desired state scripts as children of the
StateMachine. - Assign the initial state to the
current_stateproperty of theStateMachine.
The StateMachine automatically manages the rest, including state transitions and processing.
A state can contain multiple nested states. When the parent state is activated, all its nested states are automatically activated and processed alongside it. When the parent state is deactivated, all nested states are also disabled.
State Lifecycle
Each state has specific lifecycle functions that define its behavior:
enter()
Defines what happens when the state is activated.
exit()
Defines what happens when the state is deactivated.
update()
Defines what happens during each process frame while the state is active.
physics_update()
Defines what happens during each physics process frame while the state is active.
Changing States
To transition between states you can:
-
Call the
enable()function on the desired state: this will activate the state and deactivate the current state. This is useful when a state needs to be activated immediately. -
Call the
complete()function of the current state: this will mark the state as “completed”, meaning it will activate the states defined in itson_completionarray. This is useful when a state needs to perform some actions before transitioning to another state and can be considered “completed” when those actions are done. For example, a dialogue state can be considered “completed” when the dialogue ends. -
Set a timer: set the
time_rangeproperty of the state. The current state will transition to theon_completionstates when the timer expires. This is useful when a state have to be activated after a certain amount of time. For example, the enemy can follow the player for a limited time before returning to the patrol state.
Under the same StateMachine, when a new state is activated the current state
is always automatically disabled.
Pre-built States
The template includes several pre-built states that you can use out of the box:
- StateAnimation: starts an animation defined in an
AnimationPlayerorAnimationTree. - StateCallable: invokes a method from another node.
- StateDebug: prints a message in the terminal for debugging purposes.
- StateDialogue: starts a dialogue defined using the Dialogue System .
- StateInteract: manages interactions using the Interaction System .
- StateMaterial: changes the material of a Sprite2D node.
- StateParamsSetter: sets properties of a node upon entering and/or exiting the state.
- StateTween: defines and calls a tween on a node.
- StateEntity: the base state from which all specific entity states extend.
The states that extend StateEntity are:
- StateFollow: makes the entity follow a target (without using
NavigationAgent2D). - StateIdle: stops the entity and possibly disables it.
- StateImpulse: applies an impulse to the entity.
- StateInputListener: handles inputs to move and control the entity (eg: the player).
- StateNavigation: makes the entity follow a target using a
NavigationAgent2D(useful for avoiding obstacles). - StatePath: makes the entity follow a path defined in a
Path2D. - StateWander: makes the entity wander around randomly.
You can always create new states by extending the base scripts state.gd or
state_entity.gd.
Listening for State Changes
The ChangeStateListener node allows you to listen for state changes in another node’s StateMachine.
For each listening state, you can associate a state to enable.
This functionality is useful for managing interactions between different game elements.
For example, a door can listen to the states of a switch and open or close based
on the active state of the switch. Adding a ChangeStateListener node to a door
we’ll have a situation as shown in the image below:
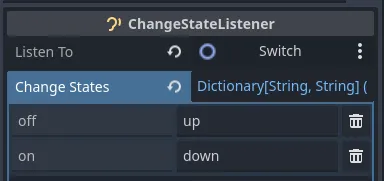
- When the state “off” of the switch is activated, the state “up” of the door is activated.
- When the state “on” of the switch is activated, the state “down” of the door is activated.